What is Cypress.io ?
Cypress.io is a JavaScript-based automation testing tool that is helpful in creating automation test cases. By using Cypress, you can create test cases for modern web applications, debug them visually, and automate them in a continuous build. Cypress is a frontend testing tool that helps QA developers automate browser-based testing, making the QA process faster and safer.
System Requirements and installation
To run the cypress automation test cases here are the system requirements
macOS 10.15 and above (Intel or Apple Silicon 64-bit (x64 or arm64))
Linux Ubuntu 20.04 and above, Fedora 38 and above, and Debian 10 and above (x64 or arm64) (see Linux Prerequisites down below)
Windows 10 and above (64-bit only)
Cypress requires Node.js in order to install and here are the list of supported versions
Node.js 18.x, 20.x, 22.x and above
Hardware Requirements
CPU
2 CPUs minimum to run Cypress
1 additional CPU if video recording is enabled
1 additional CPU per process you run outside of Cypress, such as:
App server (frontend)
App server (backend)
App database
Any additional infrastructure (Redis, Kafka, etc..)

Memory
4GB minimum, 8GB+ for longer test runs
All the above information is collected form the official site (https://docs.cypress.io/guides/getting-started/installing-cypress#System-requirements)
Linux Prerequisites
For the Linux you have to install some dependencies to run the cypress on the system. Check the following document https://docs.cypress.io/guides/getting-started/installing-cypress
How to install Cypress in Drupal ?
To install Cypress in your Drupal setup, first check the Node.js version on your system. You can use the following commands to check the Node.js version, which should be above 16 to meet Cypress requirements.

If your Node.js version is below 16, update it. You can refer to this DigitalOcean tutorial for instructions on updating Node.js on Ubuntu.
Once all the setup is complete, proceed with the Cypress setup. Here are the steps to install Cypress on Drupal.
Step 1 - Create the directory
It is recommended to set up Cypress at the root of your Drupal installation. Create a directory with any name; I am naming it 'cypress'. So the directory structure of your setup will look like this.
cypress
vendor
web
- core
- themes
- modules
composer.json
composer.lock
Step 2 - Install the Cypress
Now, use npm or yarn to install Cypress in your Drupal setup.
Using NPM
npm init -y
npm install cypress --save-dev

Using Yarn
npm init -y
yarn add cypress
This will create a package.json, package-lock.json, and a node_modules directory at the root of your project.
Step 3 - Configure the Cypress
To configure the cypress run the following command -
Using NPM
npx cypress open

Using Yarn
yarn cypress open
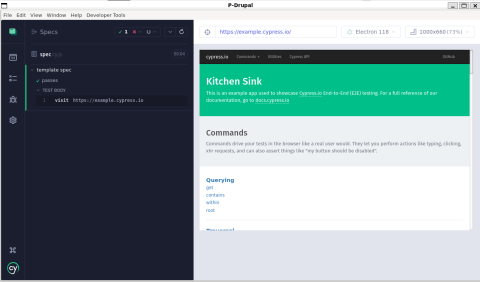
It will open the cypress browser window on your system

Click on "E2E Testing" and follow the prompts. This will automatically generate the necessary files in the Drupal root, start the E2E testing, create a new spec, and execute the the spec.

Next, open the cypress.config.js file located at the root of the project and add the baseUrl of your current setup.
const { defineConfig } = require("cypress");
module.exports = defineConfig({
 e2e: {
   setupNodeEvents(on, config) {
     // implement node event listeners here
   },
   baseUrl: "https://example.org", // Change the base URL
 },
});
Step 4 - Write the first test case using Cypress
Create the file "logn.cy.js" at "cypress/e2e/login.cy.js" and start writing the first test case to check the login process.
describe('Login test case', () => {
  it('passes', () => {
    cy.visit('/user/login')

    cy.get('input[name="name"]')
      .type('admin')
    cy.get('input[name="pass"]')
      .type('admin')
    cy.get('input[data-drupal-selector="edit-submit"]') // You can also use the id or class
      .contains('Log in')
      .click()
    cy.contains('Member for')
  })
})
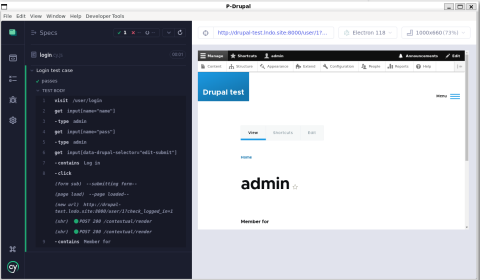
Now, run the npm cypress open and run the login spec and then you will see the following output.

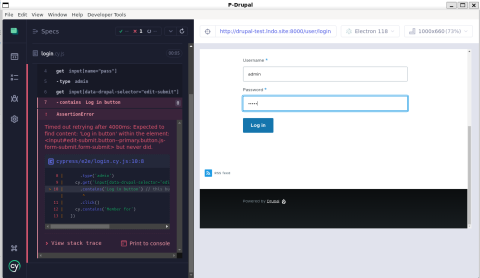
In the above screenshot, you can see that all the steps are running successfully without any errors in this spec. However, if we add an unreachable element, an error will be displayed at runtime. For example, here is a test that generates an error.
describe('Login test case', () => {
  it('passes', () => {
    cy.visit('/user/login')

    cy.get('input[name="name"]')
      .type('admin')
    cy.get('input[name="pass"]')
      .type('admin')
    cy.get('input[data-drupal-selector="edit-submit"]') // You can also use the id or class
      .contains('Log in button') // this button doesn't exist so it will show us the error.
      .click()
    cy.contains('Member for')
  })
})
By running the above spec it will cause the following error on cypress.

Now, you can write additional test cases according to your project requirements. Cypress offers many features to explore, such as creating custom commands and using Cypress plugins. If you encounter any issues, you can refer to the documentation for assistance.


